Back to Main Index.
Adapted & Shortened from

Digital Lighting & Rendering
By Jeremy Birn
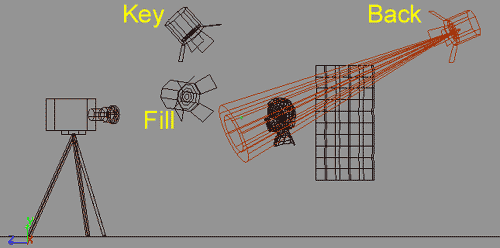
Three lights: the Key Light, Fill Light, and Rim Light (also called Back Light), are adjusted to achieve the classic Hollywood lighting scheme called three-point lighting.

This GIF Animation shows the role of the 3 lights.
Here's how to set them up in your 3D scenes:
1. Start in Darkness. Make sure there are no default lights, and there's no global ambience. When you add your first light, there should be no other light in the scene.
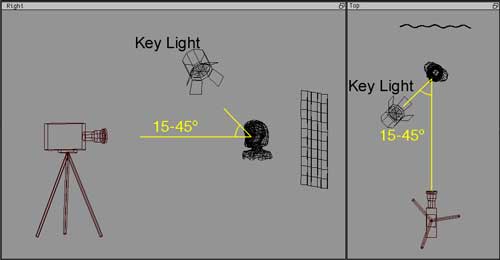
2. Add your Key Light. The Key Light creates the subject's main illumination, and defines the most visible lighting and shadows. Your Key Light represents the dominant light source, such as the sun, a window, or ceiling light - although the Key does not have to be positioned exactly at this source.
Create a spot light to serve as the Key. From the top view, offset the Key Light 15 to 45 degrees to the side (to the left or right) of the camera. From a side view, raise the Key Light above the camera, so that it hits your subject from about 15 to 45 degrees higher than the camera angle.
The key light is brighter than any other light illuminating the front of the subject, is the main shadow-caster in your scene, and casts the darkest shadows. Specular highlights are triggered by the Key Light.
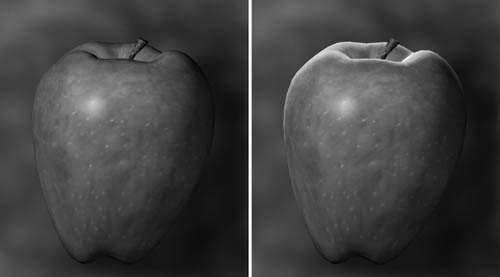
NOTE: Be sure to stop and do test-renders here. Your "one light" scene (with just the key light) should have a nice balance and contrast between light and dark, and shading that uses all of the grays in between. Your "one light" should look almost like the final rendering, except that the shadows are pitch black and it has very harsh contrast - see the GIF animation at the top of this page, while it only has the Key light visible.
3. Add your Fill Light(s). The Fill Light softens and extends the illumination provided by the key light, and makes more of the subject visible. Fill Light can simulate light from the sky (other than the sun), secondary light sources such as table lamps, or reflected and bounced light in your scene. With several functions for Fill Lights, you may add several of them to a scene. Spot lights are the most useful, but point lights may be used.
From the top view, a Fill Light should come from a generally opposite angle than the Key - if the Key is on the left, the Fill should be on the right - but don't make all of your lighting 100% symmetrical! The Fill can be raised to the subject's height, but should be lower than the Key.

At most, Fill Lights can be about half as bright as your Key (a Key-to-Fill ratio of 2:1). For more shadowy environments, use only 1/8th the Key's brightness (a Key-to-Fill ratio of 8:1). If multiple Fills overlap, their sum still shouldn't compete with the Key.
Shadows from a Fill Light are optional, and often skipped. To simulate reflected light, tint the Fill color to match colors from the environment. Fill Lights are sometimes set to be Diffuse-only (set not to cast specular highlights.)
4. Add Rim Light. The Rim Light (also called Back Light) creates a bright line around the edge of the object, to help visually separate the object from the background.
From the top view, add a spot light, and position it behind your subject, opposite from the camera. From the right view, position the Back Light above your subject.
Adjust the Rim Light until it gives you a clear, bright outline that highlights the top or side edge for your subject. Rim Lights can be as bright as necessary to achieve the glints you want around the hair or sides of your subject. A Rim Light usually needs to cast shadows. Often you will need to use light linking to link rim lights only with the main subject being lit, so that it creates a rim of light around the top or side of your subject, without affecting the background:
That's it. Three-Point Lighting can be a simple starting-point for lighting just about any subject. By walking through it, this tutorial introduced 3 of the main visual functions served by lights in your 3D scenes: Key Light, Fill Light, and Rim Light. In a more complex scene, there are other types of lights used as well: Practical Lights, Bounce Lights, Kickers, and Specular Lights, which serve other visual functions. The book Digital Lighting & Rendering goes into much more depth about these.
The vocabulary of describing lights by their visual function is something you can apply in any scene. However, even when you use Key, Fill, and Rim lights, don't think of three-point lighting as an excuse to light by formula, or to make every scene look the same. You should begin each scene by looking at what is motivated, by which kinds of light would really be in that particular scene. There is usually some direction from which the light is brightest, and that is where the Key light should come from. If the object is back-lit, then there may be a rim, in other cases there isn't one. It is observing the actual colors, tones, contrast, and direction of real light that actually informs how to create believable scenes in 3D.
While the original first edition of Digital Lighting & Rendering had a chapter focused on Three Point Lighting (which was the inspiration for this tutorial), the new Second Edition de-emphasizes this approach. Three Point Lighting is still covered in the chapter on Lighting Creatures and Characters, but it is put into a context of understanding the different visual functions of lights that are commonly used in lighting animated characters. By not presenting it first, hopefully beginning artists won't mistake three point lighting for any kind of a formula or recipe. If you are trying to create believable lighting that fits with each unique situation, there's no shortcut to skip studying the motivations and qualities of real lights that would occur in a particular scene.
Copyright 2000-2007 Jeremy Birn, 3dRender.com. Adapted & shortened by permission of New Riders Publishing from [Digital] Lighting & Rendering Edition 2, by Jeremy Birn.