
14. Now we need to make copies of the finger, and scale and position them in space. This is much easier to get right if you have some reference. Click here (this link defaults to open in a new window) to download a reference picture of a hand, or use your own hand or another picture.
15. Put your reference image into the front window with View>Background Bitmaps>Place. To make your reference easier to see in different windows, draw a set of curves that trace all the key contours of the reference image.
16. Remove the image. Put the curves you traced into their own layer for easy showing and hiding. Ghost the reference curves.
17. Use the ghosted curves as reference in copying, rotating, and scaling copies of your finger model.
18. To crop off the lower third of the thumb, use Surface>Rectangle>Cutting Plane to slice mark the location, then Edit>Trim.


19. In the front view, draw 5 curves as shown to the left, to make the palm. They all start coming upwards from the wrist, and all end pointing at the base of the thumb.
20. Make a duplicate copy of the set of curves, so that one set of curves defines the front of the hand, and the other set defines the back.


21. Show points on the curves, and move points in the right view to add curvature to the hand.
22. From a perspective view, loft together all of the curves. Pick them in order going around the base of the wrist. Make sure "closed" is checked, and resample to a size that looks good when you "preview."


23. Draw a set of 4 curves in the front view, as shown to the left. There is one curve around the base of each finger. The curves are close together, but do not intersect.
24. Also in the front view, select the 4 curves, enter "proj," and pick the palm to project onto.
25. Put the 4 curves you drew into a hidden layer, to get them out of the way. (But keep the 4 new 3D curves that were projected onto the hand.)
25. Choose Edit>Split, with the projected curves as the cutting objects. You will not see much of a difference after this command, but it has split the hand into 5 parts: the main piece of the palm, and the 4 little sections at the base of the fingers.
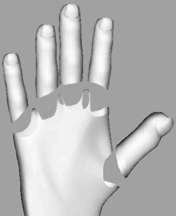
26. Select and delete the 4 pieces that are now separate objects, so that what's left looks like the figure to the right.
27. Depending on how you built or fit together the fingers with the palm, the base of the fingers might need to be cut shorter so that there is some empty space for the transition. If needed, you could cut the fingers the same way you cut the thumb in 18, or you could draw one arching curve, project it in the front window, and then trim the fingers with the projected curves.

28. Use "SrfBlend" (Surface>Blend) to build blends between the middle finger and the opening in the hand beneath it. Start by picking the curve at the trimmed hole in the hand. Make sure you have picked all of it, even if it is in 2 or 3 pieces. Then pick the curve at the base of the finger, also being sure to pick all parts of the curve. Typing "A" for "automatic" should get them lined up without a lot of trouble.
29. Repeat the command for the other fingers and the thumb, so that your hand looks like the one on the right.
30. Use Edit>Join to turn all of the surfaces into a solid. (You can actually leave out the fingernails, it won't matter, but joining guarantees a smoother transition between the blends and the other geometry.)
